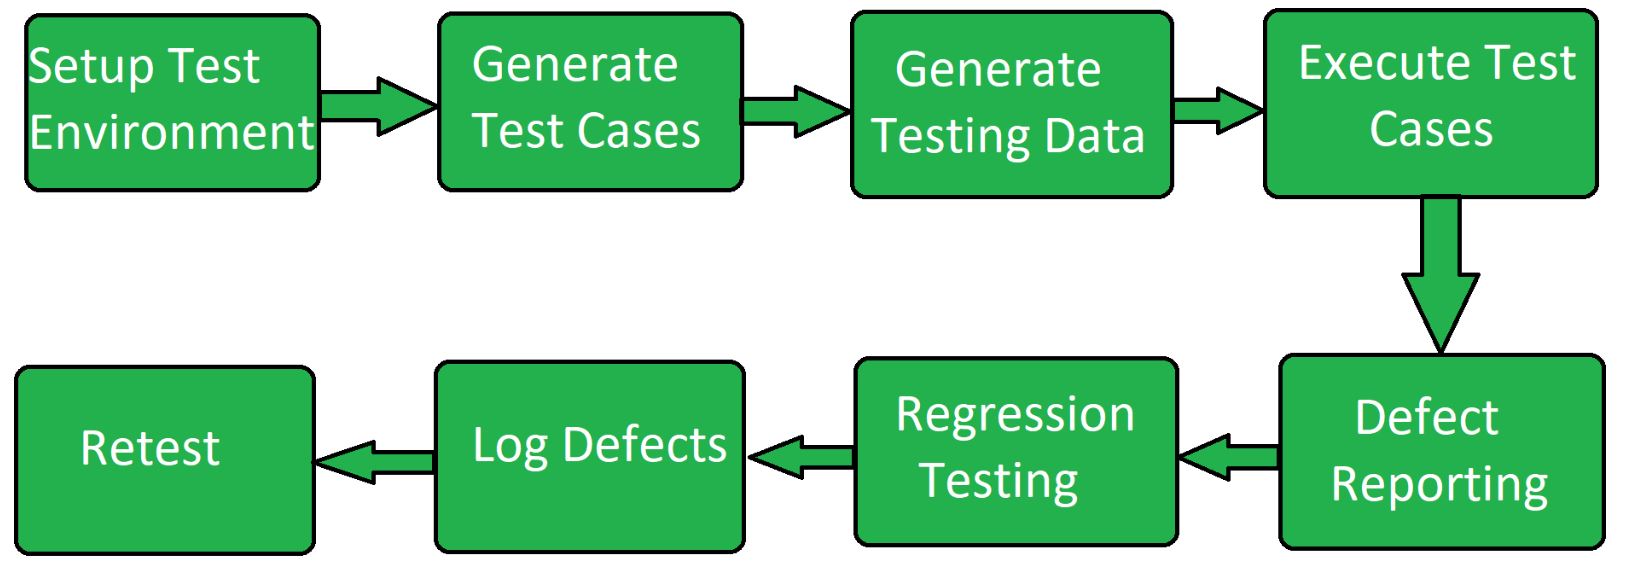
Sunday, February 19, 2023

System Testing, Integration Testing and End-to-End (E2E) Testing


System Testing: System testing is carried out on the whole system in the context of either system requirement specifications or functional requirement specifications or in contest of both. System testing tests the design and behavior of the system and also the expectations of the customer. System testing: System testing is a type of testing that validates a complete and fully integrated system to verify that it meets the specified requirements. It typically includes functional testing, performance testing, security testing, and other types of testing to ensure that the system is working as expected.

System Testing is a black-box testing. System Testing is performed after the integration testing and before the acceptance testing. 

System Testing Process: System Testing is performed in the following steps:

  • Test Environment Setup: Create testing environment for the better quality testing.
  • Create Test Case: Generate test case for the testing process.
  • Create Test Data: Generate the data that is to be tested.
  • Execute Test Case: After the generation of the test case and the test data, test cases are executed.
  • Defect Reporting: Defects in the system are detected.
  • Regression Testing: It is carried out to test the side effects of the testing process.
  • Log Defects: Defects are fixed in this step.
  • Retest: If the test is not successful then again test is performed.

 
Types of System Testing:

  • Performance Testing: Performance Testing is a type of software testing that is carried out to test the speed, scalability, stability and reliability of the software product or application.
  • Load Testing: Load Testing is a type of software Testing which is carried out to determine the behavior of a system or software product under extreme load.
  • Stress Testing: Stress Testing is a type of software testing performed to check the robustness of the system under the varying loads.
  • Scalability Testing: Scalability Testing is a type of software testing which is carried out to check the performance of a software application or system in terms of its capability to scale up or scale down the number of user request load.
Integration Testing : Integration testing is a method of testing how different units or components of a software application interact with each other. It is used to identify and resolve any issues that may arise when different units of the software are combined. Integration testing is typically done after unit testing and before functional testing, and is used to verify that the different units of the software work together as intended.

Integration testing can be performed in different ways, such as:


  1. Top-down integration testing: It starts with the highest level modules and integrates them with lower-level modules.
  2. Bottom-up integration testing: It starts with the lowest-level modules and integrates them with higher-level modules.
  3. Big-Bang integration testing: It combines all the modules and integrates them all at once.
  4. Incremental integration testing: It integrates the modules in small groups, testing each group as it is added

End-to-end Testing: End-to-end testing is a type of software testing used to test whether the flow of a software from initial stage to final stage is behaving as expected. The purpose of end-to-end testing is to identify system dependencies and to make sure that the data integrity is maintained between various system components and systems. End-to-end testing: End-to-end testing, also known as end-to-end functional testing, is a type of testing that validates the flow of a system from start to finish. It simulates the real-world use of the system and tests it as a whole, including testing the interactions between different components.

Difference between Regression, Smoke and Sanity Test

Regression Testing

A superset of smoke and sanity testing, regression testing is usually performed when testers have ample time. It is an automated process where after adding new functionalities, a detailed targeting of all the affected areas is done and it’s an emphasis on already existing features.  Regression testing is executed after making some significant changes in the software build.  In order to verify the bugs and other changes in the requirements, some form of testing needs to be done and that is where you can perform this concept of testing. It is conducted after sanity testing of the changed functionalities, where all the impacted features of an application are put through thorough testing which leads to Quality Assurance and related functionalities. It is done only by the Quality Assurance team.

Regression testing needs to be done whenever there is a requirement to change the code and it needs to be tested whether it is functioning properly or not. Also, when any other new feature is incorporated in the software or application, defects and performances have to be tested. Optimizations, deleting existing features, correction of errors, and enhancements are key aspects of regression testing.

The process of regression testing can easily be understood with the help of a simple example where you have given a messaging application to test. This messaging application has features like sending and receiving texts and making phone and video calls. The developers have added a new feature of making payments online and also made changes in the phone call option where you can talk to multiple people at once. The impact of these changes on other functionalities and the overall working of the application has to be tested, this is called regression testing.

Smoke Testing

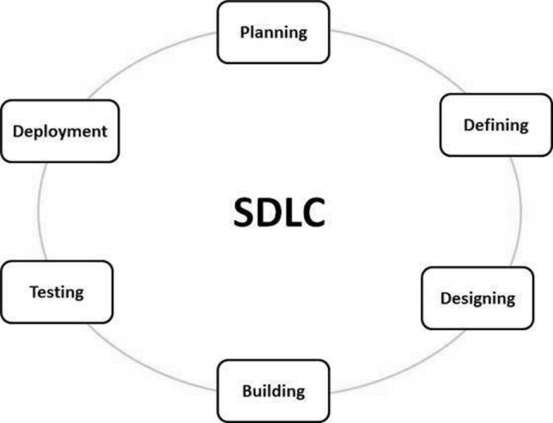
With the main aim to reject any defective software build, smoke testing makes sure that the Quality Assurance team can directly work on the issue, rather than wasting time on installing and testing the software or the application. Generally performed during the initial stages of the Software Development Life Cycle (SDLC), this testing makes sure that the core/main features of an application are working without any predicament. The primary purpose of smoke testing is not to perform deep testing but to make sure that the core functionalities are working seamlessly. This process is done before any other detailed tests are done.

Also known as the build verification test, smoke testing magnifies issues in critical areas rather than the complete application. Smoke testing is done not only by testers but also by developers. A subset of a rigorous testing process, smoke testing uses test cases to cover important components of the build. There is no time-consuming exhaustive tests however, only verification that crucial elements are working properly. It is supposed to be performed only when the developers provide the Quality Assurance team with a novel and a fresh build. A fresh build means software that has new changes incorporated in it. One can also perform smoke testing when a new module is included in an already present functionality.

 It should be done for every new release and every new build in the software if it requires to be done on a daily basis. Once your build is stationary and stable, you can also go in for an automated smoke test. A smoke test is critical since it prevents any broken and unstable build and simultaneously helps to find any integration issues much faster. It makes rectifications and detection an easy process and provides confidence to the tester to proceed with the other stages of testing. Along with the features of the build, overall performance, security, and privacy policy can also be tested.

Let’s continue with the same example where you have been given a messaging application to smoke test. The key aspects of this application would be composing a message, sending it, and receiving messages and if the messages are not sent, other functions like uploading status, seeing the status, changing profile picture, etc. will make sense. This simply means that you will have to drop the software build without any other process since the core functionalities do not work. This is called smoke testing.

Sanity Testing

Also known as Surface Level Testing, sanity testing simply decides if the software build is received after many regressions and it is good and stationary enough to pass it to the next stage/level of testing. When a new functionality or a new module is added to any software/ application, sanity testing needs to be done; it is a process where a quick evaluation is done of the quality of the software that has to be released and also to figure out whether it is eligible for the next stage of testing or not. When minor changes are made in the code or the functionality of the build, sanity testing is done since it further decides whether end to end testing of the build should be carried out or not.

In order to verify and validate the compliance of the newly added modules, functions, and features, sanity testing should be carried out. This process also ensures that the changes that have been introduced do not have an impact on the other functionalities of the product. When the software is received after fixing the bugs or just before the deployment, sanity testing should be done.

Sanity testing in QA is a part of regression test. Failure in sanity testing leads to a complete rejection of the build to save time and money. Sanity testing is performed only after it has completed the smoke test and has been accepted for further stages of testing by the quality assurance team. The primary focus of the team is to validate the functionality of the build by not doing a detailed test. In this test, we do not check the entire functionality of the application instead we figure out if the developer has used some form of intellect and logic (sanity) while developing this software.

Usually, in other forms of testing, there is a hard and fast rule when it comes to the actual process of testing but sanity testing has a different way. It is not bound by a certain set of rules. Sanity test is rapid and speedy and to make it even more productive, the QA engineers usually don’t script the test cases. The core objective is to make sure that the false results or the bugs are not in the component processes.

Three phases have to be carried out to perform sanity testing:

  1. Identification – This step involves the process of identifying the new modules, features, and functionalities. Along with this, the tester also has to keep an eye on the changes or modifications that might have been introduced in the code when bugs were getting fixed.

  2. Evaluating- This step involves the checking of the newly implemented features and to check whether they are working as intended or not.

  3. Testing- The last step involves a random check of all the parameters, elements, and functionalities.

If these three steps go faultlessly, the build can be passed for comprehensive testing. If we continue with the example of testing a text messaging application, and this time you have to perform a sanity test on it. After the process, you found out that instead of seeing the status of another person you are seeing their profile picture, then, there is no point in checking other advanced functionalities like making online payments, customizing stickers, having a conference video call, and so on because the basic features fail to work.

“Pointers to note”

  • While smoke testing has to verify stability and regression testing the impact, sanity testing has to verify the rationality in any software built.

  • Regression testing helps to enhance the quality of the product that is being deployed whereas smoke and sanity testing aids the Quality assurance team by saving their time and effort.

  • Smoke testing is performed at the initial stage whereas regression and sanity testing are performed towards the end in order to check the functionalities.

  • The quality Assurance team has to perform all three tests one after the other. All these tests have a defined number of test cases that have to execute numerous times. A smoke test is done first, which is followed by sanity testing, and then if time permits, regression testing is done.


How would you Prioritize your bug

There are a few reasons why you may need to classify and prioritize bugs. The first reason is that it can help you to better understand the bug and how it affects your product. By understanding the bug in this way, you can improve the design of your product or fix the bug before it becomes a bigger problem. The second reason for classifying and prioritizing bugs is to determine which bug is causing the most problems. By identifying which bug is causing the most trouble, you can work to fix it first. This will help to prevent further issues from occurring and will speed up your product's release date. Finally, classifying and prioritizing bugs can also help you to track down who is responsible for fixing them. This information can be useful in order to hold individuals accountable for their actions, and it can also help you to keep track of progress made towards fixing the bug.

How to Classify and Prioritize Bugs?

Bug classification and prioritization is an important part of software development. It helps to identify and fix the most important bugs quickly. There are several different ways to classify bugs, but the most common classification schemes are:

1. Critical - Critical bugs are those that can cause serious problems if not fixed. They should be fixed as soon as possible.

2. High - High-priority bugs are those that may cause some inconvenience, but don't necessarily pose a threat to the system or users. They should be fixed as soon as possible but may not take priority over critical bugs.

3. Normal - Normal-priority bugs are those that don't necessarily affect the system or users but could still be fixed if necessary. They should not be ignored but may not take priority over other bug fixes.

4. Low - Low-priority bugs are those that do not pose a threat to the system or users but could still be troublesome if not fixed. They should only be addressed if there is no other option, and they don't conflict with other projects.

Why screen shot is important when logging a bug

A screen shot in software development is a picture or an image taken to show steps taken to display what is being tested or the expected results. Most of the times it is done to document bugs or defects on the screen. This benefits the developer to reproduce the defect that his/her code may have caused in the system to not function correctly as it was before. There are very many tools used in testing to take screen shots. Some tools are free downloads and other are license based. Most common tools used are SnagIt, Snipping tool, Jing and so on. It depends on what your organization wants or what it prefers for their testers to use.

Importance of good screen shots

  • Quick turn round on defects – Good screen shots help the developer figure out how the defect was produced by the tester. The developer will follow what is documented by the test case. If he happens to get the same results as the tester, he/she will be able to fix the bug hence quick turn around on it. This helps the testing team to meet the deadline of the projects. If the screen shots are bad, it will take some time for the coder to figure out what the tester was doing to reproduce the bug.

  • Easy to understand – More so good screen shots make anyone even if they are not IT professionals to follow the workflow easily. This always comes in handy when the QA analyst is not available, and you need someone to fill in to help with the testing. The novice person can easily follow the screen shots to understand the flow. He/she will bring in a different perspective to testing instead of the biased one from the developer.

  • Simplify Quality Assurance Tasks – Furthermore, good screen shots can help the testing team write better test cases based on them without reading all the business analyst documents. Ad hoc testing can be easily done just looking at screen shots.

How to log bugs

 Detecting and reporting an error is an important part of Software Testing. As software testing improves the quality of software and deliver a cost-effective solution which meets customers requirements, it become necessary to log a defect in a proper way, track the defect, and keep a log of defects for future reference. As a tester tests Application and if the tester finds any defects, the life cycle of defects start and it become very important to communicate the defect to the developers to get it fixed, keep track of current status of the defect, find out if there is any such defect(similar defect) was ever found in last attempts of Testing.

For this purpose, previously created manual documents were used, which were circulated to everyone associated with the software project(developer and tester), Nowadays, many bug reporting tools are available which help in tracking and managing the bugs in an effective way. 

How to report a bug?

It is a good practice to take screen shots of execution at every step during software testing. if any test case fails during execution, it needs to be failed in the bug reporting tool and a bug has to be reported/logged for the same. The tester can choose to first report a bug and then fail the test case in the bug reporting tool or fail a test case and report a bug. in any case Bug ID that is generated for the reported bug should be attached to the test case that has failed. such as Project, Summary, Description, Status, Detected By, Assigned To, Date Detected, Test Lead, Detected in Version, Closed in Version, Expected Date of Closure, Actual Date of Closure, Severity, Priority and Bug ID. After reporting a bug, a unique Bug ID is generated by the bug reporting tool, which is then associated with the failed test case. This bug ID helps in associating the bug with the failed test case. After the bug is reported, it is assigned a status of 'New', which goes on changing as the bug fixing process progresses. This file containing test case and the screen shots taken are sent to the developers for reference. As the tracking process is not automated, it becomes important to keep updated information of the bug that was raised till the time it is closed.

My Bug Report should include the following details when reporting the bug to the developer.

  • Defect ID — The defect’s unique identifying number.
  • Defect Description — Detailed explanation of the Defect, including information about the module where the Defect was discovered.
  • Version — The application version in which the flaw was discovered.
  • Steps — A detailed set of steps with screenshots that the developer can use to reproduce the issues.
  • Date Raised — Date when a Defect Is highlighted
  • Reference — To help explain the fault, include references to papers such as specifications, design, architecture, or even screenshots of the error.
  • Detected By — Name/ID of the tester who reported the issue
  • Status — The defect’s current state
  • Fixed by — Name/ID of the developer who made the fix
  • Date Closed — The date on which the defect was resolved.
  • Severity — the fault defines its influence on the application.
  • Priority — that is related to the urgency of defect correction. Severity According to the impact urgency with which the issue should be corrected, the priority could be set to High, Medium, or Low.

What would you do during Test Design phase in STLC

With the test plan in place, testers can begin to write and create detailed test cases. In this STLC phase, the QA team fleshes out the details of the structured tests they will run, including any test data they will need to facilitate those tests. While tests must ultimately validate the areas defined by requirements, testers can exert their skills and creativity in how they achieve this task.

When conceptualizing test cases, the tester’s goal should be to validate functionality within the allotted time and scope, especially core functionality. Test cases should be simple and well understood for any member of the team, but also unique from other test cases. Test cases should aim to achieve full coverage of the requirements in the specifications document — a traceability matrix can help track coverage. It’s important that test cases be identifiable and repeatable, as developers will add new functionality to the product over time, requiring tests to run again. They must also not alter the test environment for future tests, especially when validating configurations.

Test cases might also require maintenance or updates over time to validate both new and existing functionality. This work also occurs at this STLC stage.

Once test cases are ready, a test team lead or peer can review them. They might also review and update automated test scripts at this STLC stage. Ultimately, the team prioritizes and organizes these test cases into test suites that run later.


Software Testing Life Cycle (STLC)

The Software Testing Life Cycle (STLC) is a systematic approach to testing a software application to ensure that it meets the requirements and is free of defects. It is a process that follows a series of steps or phases, and each phase has specific objectives and deliverables. The STLC is used to ensure that the software is of high quality, reliable, and meets the needs of the end-users.

The main goal of the STLC is to identify and document any defects or issues in the software application as early as possible in the development process. This allows for issues to be addressed and resolved before the software is released to the public.

 Phases of STLC: 
 

 1. Requirement Analysis:

Requirement Analysis is the first step of Software Testing Life Cycle (STLC). In this phase quality assurance team understands the requirements like what is to be tested. If anything is missing or not understandable then quality assurance team meets with the stakeholders to better understand the detail knowledge of requirement.

The activities that take place during the Requirement Analysis stage include:

  • Reviewing the software requirements document (SRD) and other related documents.
  • Interviewing stakeholders to gather additional information.
  • Identifying any ambiguities or inconsistencies in the requirements.
  • Identifying any missing or incomplete requirements.
  • Identifying any potential risks or issues that may impact the testing process.

Creating a requirement traceability matrix (RTM) to map requirements to test cases.
At the end of this stage, the testing team should have a clear understanding of the software requirements and should have identified any potential issues that may impact the testing process. This will help to ensure that the testing process is focused on the most important areas of the software and that the testing team is able to deliver high-quality results.

  2. Test Planning: 

Test Planning is most efficient phase of software testing life cycle where all testing plans are defined. In this phase manager of the testing team calculates estimated effort and cost for the testing work. This phase gets started once the requirement gathering phase is completed.

The activities that take place during the Test Planning stage include:

  • Identifying the testing objectives and scope
  • Developing a test strategy: selecting the testing methods and techniques that will be used
  • Identifying the testing environment and resources needed
  • Identifying the test cases that will be executed and the test data that will be used
  • Estimating the time and cost required for testing
  • Identifying the test deliverables and milestones
  • Assigning roles and responsibilities to the testing team
  • Reviewing and approving the test plan

At the end of this stage, the testing team should have a detailed plan for the testing activities that will be performed, and a clear understanding of the testing objectives, scope, and deliverables. This will help to ensure that the testing process is well-organized and that the testing team is able to deliver high-quality results.

    3. Test Case Development: 

The test case development phase gets started once the test planning phase is completed. In this phase testing team note down the detailed test cases. Testing team also prepare the required test data for the testing. When the test cases are prepared then they are reviewed by quality assurance team.

The activities that take place during the Test Case Development stage include:

  • Identifying the test cases that will be developed.
  • Writing test cases that are clear, concise, and easy to understand.
  • Creating test data and test scenarios that will be used in the test cases.
  • Identifying the expected results for each test case.
  • Reviewing and validating the test cases.
  • Updating the requirement traceability matrix (RTM) to map requirements to test cases.

At the end of this stage, the testing team should have a set of comprehensive and accurate test cases that provide adequate coverage of the software or application. This will help to ensure that the testing process is thorough and that any potential issues are identified and addressed before the software is released.

   4. Test Environment Setup:

 Test environment setup is the vital part of the STLC. Basically, test environment decides the conditions on which software is tested. This is independent activity and can be started along with test case development. In this process the testing team is not involved. either the developer or the customer creates the testing environment.

    5. Test Execution:

 After the test case development and test environment setup test execution phase gets started. In this phase testing team start executing test cases based on prepared test cases in the earlier step.

The activities that take place during the test execution stage of the Software Testing Life Cycle (STLC) include:

  • Test execution: The test cases and scripts created in the test design stage are run against the software application to identify any defects or issues.
  • Defect logging: Any defects or issues that are found during test execution are logged in a defect tracking system, along with details such as the severity, priority, and a description of the issue.
  • Test data preparation: Test data is prepared and loaded into the system for test execution.
  • Test environment setup: The necessary hardware, software, and network configurations are set up for test execution.
  • Test execution: The test cases and scripts are run, and the results are collected and analyzed.
  • Test result analysis: The results of the test execution are analyzed to determine the software’s performance and identify any defects or issues.
  • Defect retesting: Any defects that are identified during test execution are retested to ensure that they have been fixed correctly.
  • Test Reporting: Test results are documented and reported to the relevant stakeholders.

It is important to note that test execution is an iterative process and may need to be repeated multiple times until all identified defects are fixed and the software is deemed fit for release.

   6. Test Closure:

Test closure is the final stage of the Software Testing Life Cycle (STLC) where all testing-related activities are completed and documented. The main objective of the test closure stage is to ensure that all testing-related activities have been completed, and that the software is ready for release.

At the end of the test closure stage, the testing team should have a clear understanding of the software’s quality and reliability, and any defects or issues that were identified during testing should have been resolved. The test closure stage also includes documenting the testing process and any lessons learned, so that they can be used to improve future testing processes.

Test closure is the final stage of the Software Testing Life Cycle (STLC) where all testing-related activities are completed and documented. The main activities that take place during the test closure stage include:

  • Test summary report: A report is created that summarizes the overall testing process, including the number of test cases executed, the number of defects found, and the overall pass/fail rate.
  • Defect tracking: All defects that were identified during testing are tracked and managed until they are resolved.
  • Test environment clean-up: The test environment is cleaned up, and all test data and test artifacts are archived.
  • Test closure report: A report is created that documents all the testing-related activities that took place, including the testing objectives, scope, schedule, and resources used.
  • Knowledge transfer: Knowledge about the software and testing process is shared with the rest of the team and any stakeholders who may need. 
  • to maintain or support the software in the future.
  • Feedback and improvements: Feedback from the testing process is collected and used to improve future testing processes.
  • It is important to note that test closure is not just about documenting the testing process, but also about ensuring that all relevant information is shared, and any lessons learned are captured for future reference. The goal of test closure is to ensure that the software is ready for release and that the testing process has been conducted in an organized and efficient manner.

What happens in the requirement analysis phase in SDLC

Requirements analysis allows software engineers to define user needs early in the development process. It helps them deliver a system that meets customers' time, budget and quality expectations. The process involves analyzing, documenting, validating and managing system or software requirements. Requirements analysis involves various tasks that help engineers understand stakeholder demands and explain them in simple and visual ways. It is essential to a software or system project's success.

For a project to be successful, its requirements must be:

  1. Testable
  2. Actionable
  3. Documented
  4. Measurable
  5. Traceable 

Requirements analysis involves various stakeholders, such as project sponsors, throughout the project as well as end users whose inputs are most important. The best results typically occur when all parties work together to develop a high-quality requirement document.

Software Development Life Cycle (SDLC)

Software Development Life Cycle (SDLC) is a process used by the software industry to design, develop and test high quality software. The SDLC aims to produce a high-quality software that meets or exceeds customer expectations, reaches completion within times and cost estimates. SDLC is a process followed for a software project, within a software organization. It consists of a detailed plan describing how to develop, maintain, replace and alter or enhance specific software. The life cycle defines a methodology for improving the quality of software and the overall development process.

The following figure is a graphical representation of the various stages of a typical SDLC.

Stages of SDLC

A typical Software Development Life Cycle consists of the following stages −

Stage 1: Planning and Requirement Analysis

Requirement analysis is the most important and fundamental stage in SDLC. It is performed by the senior members of the team with inputs from the customer, the sales department, market surveys and domain experts in the industry. This information is then used to plan the basic project approach and to conduct product feasibility study in the economical, operational and technical areas.

Planning for the quality assurance requirements and identification of the risks associated with the project is also done in the planning stage. The outcome of the technical feasibility study is to define the various technical approaches that can be followed to implement the project successfully with minimum risks.

Stage 2: Defining Requirements

Once the requirement analysis is done the next step is to clearly define and document the product requirements and get them approved from the customer or the market analysts. This is done through an SRS (Software Requirement Specification) document which consists of all the product requirements to be designed and developed during the project life cycle.

Stage 3: Designing the Product Architecture

SRS is the reference for product architects to come out with the best architecture for the product to be developed. Based on the requirements specified in SRS, usually more than one design approach for the product architecture is proposed and documented in a DDS - Design Document Specification.

This DDS is reviewed by all the important stakeholders and based on various parameters as risk assessment, product robustness, design modularity, budget and time constraints, the best design approach is selected for the product.

A design approach clearly defines all the architectural modules of the product along with its communication and data flow representation with the external and third party modules (if any). The internal design of all the modules of the proposed architecture should be clearly defined with the minutest of the details in DDS.

Stage 4: Building or Developing the Product

In this stage of SDLC the actual development starts and the product is built. The programming code is generated as per DDS during this stage. If the design is performed in a detailed and organized manner, code generation can be accomplished without much hassle.

Developers must follow the coding guidelines defined by their organization and programming tools like compilers, interpreters, debuggers, etc. are used to generate the code. Different high level programming languages such as C, C++, Pascal, Java and PHP are used for coding. The programming language is chosen with respect to the type of software being developed.

Stage 5: Testing the Product

This stage is usually a subset of all the stages as in the modern SDLC models, the testing activities are mostly involved in all the stages of SDLC. However, this stage refers to the testing only stage of the product where product defects are reported, tracked, fixed and retested, until the product reaches the quality standards defined in the SRS.

Stage 6: Deployment in the Market and Maintenance

Once the product is tested and ready to be deployed it is released formally in the appropriate market. Sometimes product deployment happens in stages as per the business strategy of that organization. The product may first be released in a limited segment and tested in the real business environment (UAT- User acceptance testing).

Then based on the feedback, the product may be released as it is or with suggested enhancements in the targeting market segment. After the product is released in the market, its maintenance is done for the existing customer base.

Test Case Vs Test Scenarios

A test-case is a set of conditions for evaluating a particular feature of a software product. Basically, test cases help in determining the compliance of an application with its business requirements.

Whereas a test scenario is generally a one-line statement describing a feature of the application to be tested. It is used for end-to-end testing of a feature. Usually, it is derived from the use cases.

Test Case vs Test Scenario

Test CaseTest Scenario
A test case contains clearly defined test steps for testing a feature of an application.A test scenario contains a high-level documentation, describing an end-to-end functionality to be tested.
Test cases focus on “what to test” and “how to test”.Test scenarios just focus on “what to test”.
These have clearly defined step, pre-requisites, expected results etc. Hence, there is no ambiguity.Test scenarios are generally one-liner. Hence, there is always possibility of ambiguity during testing.
Test cases can be derived from test scenarios. They have many to one relationship with the test scenarios.These are derived from use cases.
Test cases are efficient in exhaustive testing of application.Test scenarios are beneficial in quick testing of end-to-end functionality of the application.
More resources are required for documentation and execution of test cases.Relatively less time and resources are required for creating and testing using scenarios.

Use Case Vs Test Case


Use cases are designed in the requirement and design phase of the SDLC methodology. Use cases are used to explain and document the interaction that is required between the user and the system to accomplish the user’s task. They are created to help the development team understand the steps that are involved in accomplishing the user’s goals.

Once created, use cases can often be used to derive more detailed functional requirements for the new system.

Test cases are derived from the use case and used in the testing phase of the SDLC methodology. It is used to validate whether the AUT under test is working as per requirement or not.

Below are the differences between Use Case and Test Case in tabular format.

Use CaseTest Case
A use case is a graphical representation of actions that describes the behavior of a system to do a particular taskTest Case is a document specifying a set of actions to be performed on the application under test to verify the expected functionality of the feature
To create a use case SRS (System Requirement Specification) is requiredTo write a test case preconditions, test data and steps are required
It is dependent on the requirement documentIt is dependent on the use case
Business Analyst create use case by collecting the requirementTester/ QA Analyst create a test case by using use case
End user executes the use caseTesters executes the test case
The purpose of use case is to understand the end-user interaction with the systemThe purpose of the test case is to validate whether that particular feature is functioning as expected or not.
The use case focuses on the end userTest case focuses on the Test result
The result of the use case has not been verifiedThe result of a test case is verified with the expected result
Use case interacts with the userTest case interacts with the result
Use case creation can be helpful in the requirement gathering, and design phaseTest case is executed in the testing phase


System Testing, Integration Testing and End-to-End (E2E) Testing

  System Testing: System testing is carried out on the whole system in the context of either system requirement specifications or functional...